Charles UI Pack

Introduction
Download here

Each map has already assigned its UI Widget and with its respective GameMode, in the Character Blueprint of each GameMode is the nodes that call the UI Widget and also the load of the graphic configuration

-----------------------------------
1. Here all the variables of all the WIdget UI are saved
2. Here are all the functions for the operation of the graphic configuration
----------------------------------------------------

1. Render Quality: Increase or decrease the quality of the resolution scale.
2. Overall Graphics: Increase or decrease the overall graphic quality (textures, shadows, post processing, foliage, view distance and visual effects).
3. Antialiasing: Activate / deactivate the Antialiasing.
4. Blurred Effects: Activate / deactivate the Motion Blur.
5. Ambient Occlusion: Activate / deactivate the Ambient Occlusion.
6. Vertical Sync: Activate / deactivate the Vertical Sync.
7. The Back Button: Pressing the Back button will apply the graphic, language and subtitle settings chosen and you will return to the game.
NOTE: The Fullscreen option is enabled by default in this UI Widget
-----------------------------
RB Style
RB comes from Radio Button, those boxes that are exclusive in some user interfaces. This interface is a bit different since it is divided into three interfaces that are in the Content Browser:
Content / CharlesUIPack / UI / SubUI / RB.

Brightness:

Move the circle with the triangle in the middle to calibrate the brightness of the screen, with LOW being the darkest brightness and HIGH the most intense brightness. You can also see in real time how the stage looks with the brightness you have chosen.
Resolutions:
Here you can choose the desired resolution and in real time it will be applied, by pressing the Back button, the chosen resolution will be applied. This affects the escalated resolution and the FullScreen is applied by default.

-----------------------------
Simple Settings
A simple style for those who like minimalism

1. Definition Image: It has three options: STANDARD, MEDIUM, MODERATE and SHARP. These options change the quality of scaled resolution, antialiasing. For this option, the Fullscreen mode activated, Postprocessing in maximum quality and the maximum screen resolution are predefined.
2. Vertical Syncro: Activate / deactivate the Vertical Sync.
3. Motion Blur: Activate / deactivate the Motion Blur.
4. Shadows: Enable or disable shadows in your game
5. HQ Textures: Activate or deactivate the quality of textures and visual effects.
-----------------------------
Ultra Minimal Settings
This UI Widget can be oriented for 2D or Side Scroller games

Resolutions: It has four resolutions: 800x600, 1024x768, 1280x720, the last one taking the maximum resolution your PC has.
Vertical Sync: Activate / deactivate the Vertical Sync.
Display: Is has two options: FullScreen, Windowed.
-----------------------------
Player Style
Of all the UI Widget, this is the one I like the most. XD And I hope you love it too. Enjoy it!

1. Play: Resume the game.
2. Audio Volume: Modify the overall volume of the audio in the game.
3. Settings: Here are several options such as VSync(1), Antialiasing(2) and Quality(3). To access to Quality options you just have to click on the arrow marked in the image. In Antialiasing and VSync you just have to click to activate / deactivate it. The FullScreen is actived by default.

4. Display: Switch between FullScreen and Windowed Mode
5. Info: Show a floating menu with options to exit the game and to look at other marketplace products.

a. Quality: Set the visual quality of the game, here you will adjust the resolution scale, the maximum value will be given by the maximum scaled resolution, this will usually have a super index (in blue) that indicates if your resolution is HD, FHD, 2K, UHD and 8K. Keep in mind that for this Widget UI you have the maximum screen resolution.

There in the image, in the upper right corner there is something called Options, there you can adjust the graphic configuration of the game. To confirm the changes, just click on the arrow next to the word Options

Each graphic option has four sub options: Low, Medium, High, Ultra; Low being the lowest quality and Ultra the highest quality.
--------------------------------------------------------------------------
To display the menu on each map, press the P key, and in each menu press the Back button to exit the menu, in all the back buttons it is configured to always save the graphic options chosen in the respective UI Widgets. This configuration is encoded in the blueprint of the character belonging to each map created..
For the Player Style UI, only the Info button and the Settings button can be opened/closed by clicking on the same button, so if I click on the Info icon, I can click again to close the Info window.
The suggestions I give are that each UI Widget was designed for a purpose, you can use them for your own purpose as you wish, I only give you ideas to use them in your video games:

Introduction
Hello, I wish you a wonderful day and I hope you are well ... In this blog we will see how the Charles UI Pack works. The name of each UI Widget has its origin in some object of its interface, such as CheckBox, images, even other styles based on some other video game interface... I will touch on very general topics and if you have any questions you can make a comment or write to me at: cabascarlosandres@outlook.com. Let's go there
Download here
Initial Notes
Before starting each UI Widget it carries with it the different graphic configuration and modifies the scalability of the graphic engine. I recommend that you migrate (watch video) each UI Widget differently because if you try all the UI Widget in the same project, nothing bad will happen but there may be unexpected changes and you may be confused


-----------------------------------
1. Here all the variables of all the WIdget UI are saved
2. Here are all the functions for the operation of the graphic configuration
 |
----------------------------------------------------
The UI Widgets
Led Style
It has the name of Led by checkboxes that have a bulb shape.
The white bars (1 and 2) that go upwards that are the image below are Progress Bar that are filled with a blue color with the arrows you can increase or decrease this color when required, implying that when the blue color increases, the quality of the graphics increases and viseversa
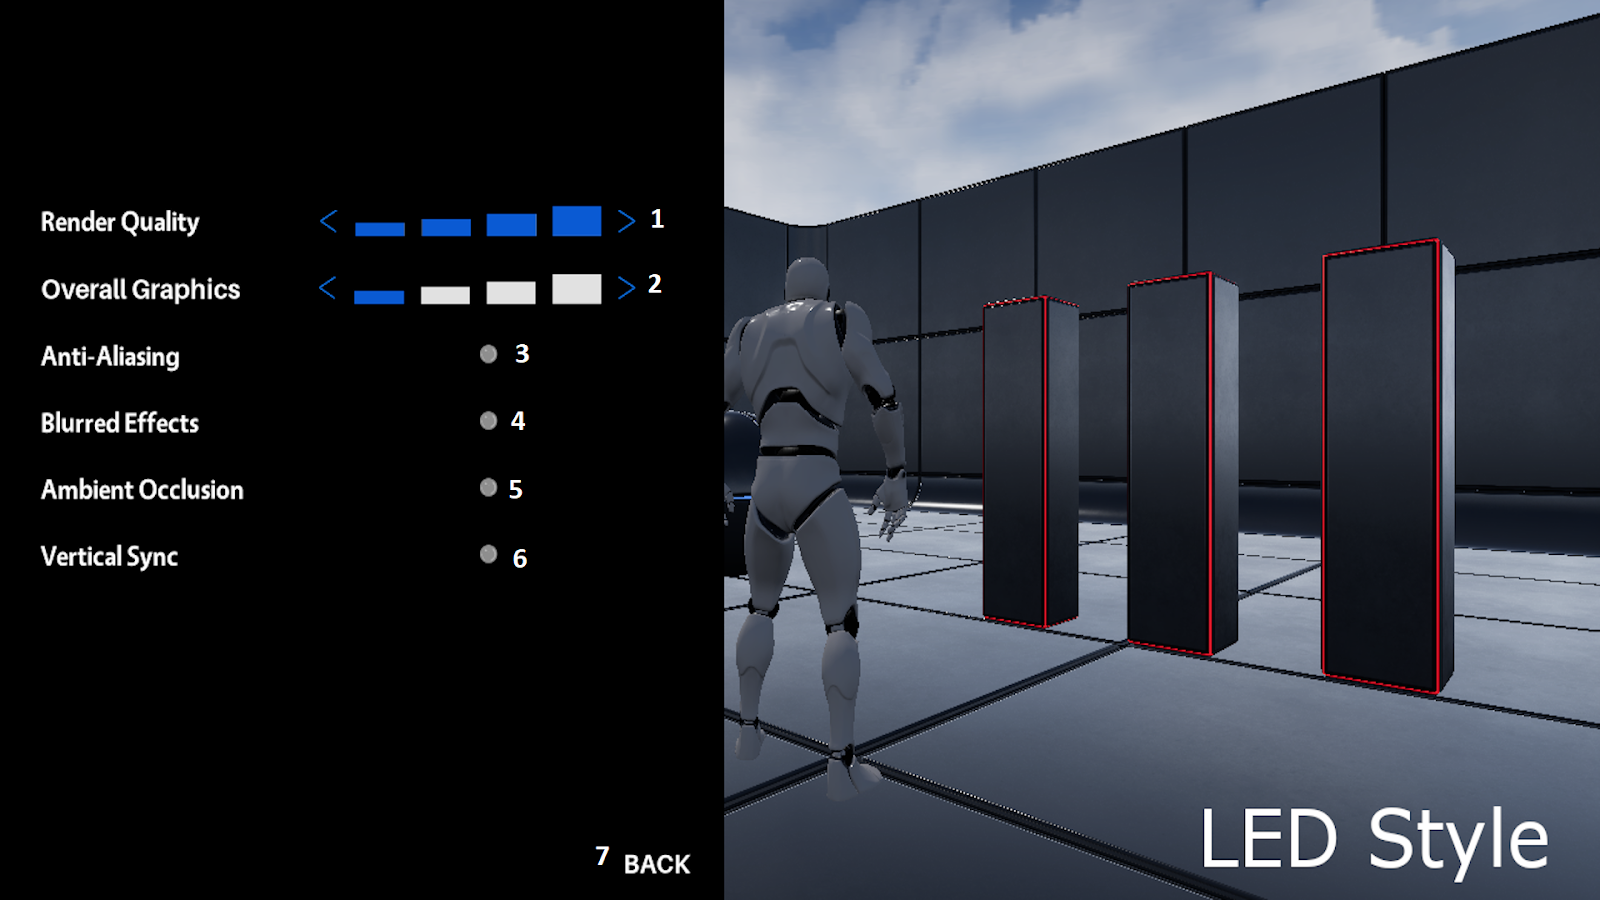
1. Render Quality: Increase or decrease the quality of the resolution scale.
2. Overall Graphics: Increase or decrease the overall graphic quality (textures, shadows, post processing, foliage, view distance and visual effects).
3. Antialiasing: Activate / deactivate the Antialiasing.
4. Blurred Effects: Activate / deactivate the Motion Blur.
5. Ambient Occlusion: Activate / deactivate the Ambient Occlusion.
6. Vertical Sync: Activate / deactivate the Vertical Sync.
7. The Back Button: Pressing the Back button will apply the graphic, language and subtitle settings chosen and you will return to the game.
NOTE: The Fullscreen option is enabled by default in this UI Widget
-----------------------------
RB Style
RB comes from Radio Button, those boxes that are exclusive in some user interfaces. This interface is a bit different since it is divided into three interfaces that are in the Content Browser:
Content / CharlesUIPack / UI / SubUI / RB.

Brightness:
Move the circle with the triangle in the middle to calibrate the brightness of the screen, with LOW being the darkest brightness and HIGH the most intense brightness. You can also see in real time how the stage looks with the brightness you have chosen.
Resolutions:
Here you can choose the desired resolution and in real time it will be applied, by pressing the Back button, the chosen resolution will be applied. This affects the escalated resolution and the FullScreen is applied by default.

-----------------------------
Simple Settings
A simple style for those who like minimalism

1. Definition Image: It has three options: STANDARD, MEDIUM, MODERATE and SHARP. These options change the quality of scaled resolution, antialiasing. For this option, the Fullscreen mode activated, Postprocessing in maximum quality and the maximum screen resolution are predefined.
2. Vertical Syncro: Activate / deactivate the Vertical Sync.
3. Motion Blur: Activate / deactivate the Motion Blur.
4. Shadows: Enable or disable shadows in your game
5. HQ Textures: Activate or deactivate the quality of textures and visual effects.
-----------------------------
Ultra Minimal Settings
This UI Widget can be oriented for 2D or Side Scroller games
Resolutions: It has four resolutions: 800x600, 1024x768, 1280x720, the last one taking the maximum resolution your PC has.
Vertical Sync: Activate / deactivate the Vertical Sync.
Display: Is has two options: FullScreen, Windowed.
-----------------------------
Player Style
Of all the UI Widget, this is the one I like the most. XD And I hope you love it too. Enjoy it!

1. Play: Resume the game.
2. Audio Volume: Modify the overall volume of the audio in the game.
3. Settings: Here are several options such as VSync(1), Antialiasing(2) and Quality(3). To access to Quality options you just have to click on the arrow marked in the image. In Antialiasing and VSync you just have to click to activate / deactivate it. The FullScreen is actived by default.

4. Display: Switch between FullScreen and Windowed Mode
5. Info: Show a floating menu with options to exit the game and to look at other marketplace products.

a. Quality: Set the visual quality of the game, here you will adjust the resolution scale, the maximum value will be given by the maximum scaled resolution, this will usually have a super index (in blue) that indicates if your resolution is HD, FHD, 2K, UHD and 8K. Keep in mind that for this Widget UI you have the maximum screen resolution.

There in the image, in the upper right corner there is something called Options, there you can adjust the graphic configuration of the game. To confirm the changes, just click on the arrow next to the word Options

Each graphic option has four sub options: Low, Medium, High, Ultra; Low being the lowest quality and Ultra the highest quality.
--------------------------------------------------------------------------
Additional notes and suggestions
For the Player Style UI, only the Info button and the Settings button can be opened/closed by clicking on the same button, so if I click on the Info icon, I can click again to close the Info window.
The suggestions I give are that each UI Widget was designed for a purpose, you can use them for your own purpose as you wish, I only give you ideas to use them in your video games:
- The Led Style UI was created for 3D video games and maybe Side Scroller too.
- The RB Style UI was created for Side Scroller video games.
- The Simple Settings UI was created for Side Scroller and 3D videogames.
- The Ultra Minimal Settings UI was created for 2D video games.
- The Player Style UI was created for 3D video games.
Thank you for reading. God bless you.
Comentarios
Publicar un comentario